wdc
Newb
Posts: 37 
|
Post by wdc on Apr 29, 2019 12:52:32 GMT -8
SEIKO 6138/6139 Repair Procedure of CENTER CHRONOGRAPH WHEEL PREAMBLE: My Quest for a Repair Procedure of Seiko 6139B CENTER CHRONOGRAPH WHEEL (PN. 888612) I have on several occasions searched for information on how to repair the infamous Seiko (6138, 6139) CENTER CHRONOGRAPH WHEEL, to no avail. Threads about the subject matter are generally sprinkled with authoritative sounding comments that they cannot be repaired. My question is why? Why can the number of parts stacked on the extended pivot shaft, stacked above the fourth wheel not be lifted off of the shaft, giving access to the fourth wheel staking location? In my case I have 2 chronos where the staking on top of the fourth wheel, holding it in place, has loosened making the wheel loose)? Logic leads me to believe, if I remove the 2-3 clutch parts (above the fourth wheel) off the top of the shaft, exposing the top of the fourth wheel, I could re-stake it and then re-install the parts in sequence, thus repairing my problem. MY QUESTION: Has anyone had success removing the stack of clutch parts above the fourth wheel and/or know of and literature explaining the procedure? NOTE (6138B) : interesting that the Center Chronograph Wheel PN.888611 is listed, as one part, (a complete) and in the diagram it is shown as one-part, but in the part list there are a number of additional parts listed. I’m assuming this is the stack of parts sitting above the fourth wheel that make up the (complete). We (or I) have only known it as one part "Center Chrono Wheel ASSY PN.888611", so why are the sub-parts listed? Did Seiko once consider this a serviceable part? I don't know. So with all of this said, how do we lift these parts off the shaft without damaging them and the chrono ASSY so that the fourth wheel can be re-staked? Thanks in advance, Will Would someone advise how to add photos. I have tried using the tool bar photo inserter to embed, link to Flickr, ect Nothing seems to work so I just added the links below. Would much rather have the photos embedded in the post , thanks 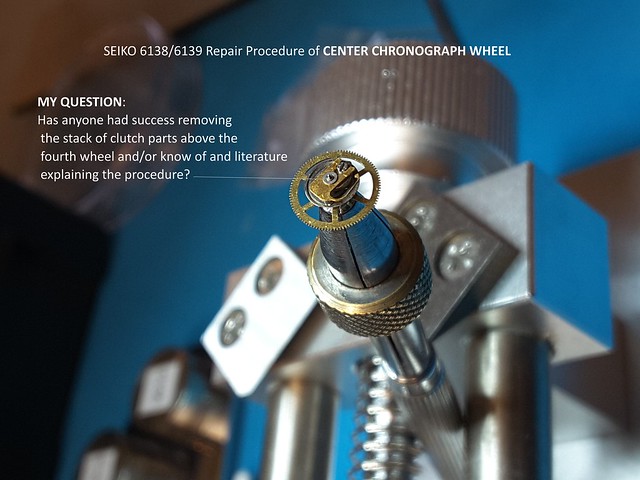 SEIKO 6138 CHRONO Repair-003 SEIKO 6138 CHRONO Repair-003 by William Cherrington, on Flickr |
|
GuyJ
Needs a Life!
Whitley Bay, UK
Posts: 2,860
|
Post by GuyJ on Apr 29, 2019 13:15:22 GMT -8
Dahasco did a thread or did some posts where he took one of these apart completely.
As for images you need the link to end in .jpg and then wrap the link in [img"] [/img"] code. (W/O quotes)
|
|
wdc
Newb
Posts: 37
|
Post by wdc on Apr 29, 2019 13:41:48 GMT -8
Dahasco did a thread or did some posts where he took one of these apart completely. As for images you need the link to end in .jpg and then wrap the link in [img"] [/img"] code. (W/O quotes) Thanks for that I will have a look for Dahasco thread. As for the images, still working on that. I have done it in past post but damn if I can figure out how I did it. Trying to wrap the brain, before wrapping img  |
|
pip
WS Benefactor
Berkshire, UK
Posts: 6,174
|
Post by pip on Apr 29, 2019 14:13:26 GMT -8
Dahasco did a thread or did some posts where he took one of these apart completely. As for images you need the link to end in .jpg and then wrap the link in [img"] [/img"] code. (W/O quotes) Thanks for that I will have a look for Dahasco thread. As for the images, still working on that. I have done it in past post but damn if I can figure out how I did it. Trying to wrap the brain, before wrapping img Will be very interested in how you get on. I’ve always been of the opinion that with the right skills and tools it should be possible. It went together right? So it should come apart. Simplistic view probably. Oh, and you need to add one pic at a time. On Flickr where it says image size in bottom right, click that then right click the size you want and save link, then paste as per Guys instructions. Or use the image button and just paste the link into it without the bits in the square brackets. Let me try with your first one...  *edit: Oh, and that’s not worked. Not sure why, I’m on my ipad so I probably arsed something up! *edit2: I checked and it had added a space between the first bit in square brackets and the start of the url. |
|
GuyJ
Needs a Life!
Whitley Bay, UK
Posts: 2,860
|
Post by GuyJ on Apr 29, 2019 15:14:53 GMT -8
|
|
|
|
Post by 69ChevelleSS on Apr 30, 2019 6:15:03 GMT -8
So . . . . was it ever determined that the wheel can or can not be fixed?
According to Spencer, it can not be fixed. He's the kind of guy that would spend hours or days trying to figure out a fix just for the challenge of it. If he say's it's not possible, I gotta believe him. I could be proven wrong (and many would be happy if I were) but I just don't see any proof so far.
|
|
|
|
Post by rob3rto on Apr 30, 2019 7:40:15 GMT -8
People once said you couldn't change out the gasket from that ubiquitous crown but now there is a way.
Could be someone just hasn't come up with a method OR [conspiracy hat on] they have and are keeping it to themselves.
|
|
wdc
Newb
Posts: 37
|
Post by wdc on Apr 30, 2019 8:09:33 GMT -8
So . . . . was it ever determined that the wheel can or can not be fixed?
According to Spencer, it can not be fixed. He's the kind of guy that would spend hours or days trying to figure out a fix just for the challenge of it. If he say's it's not possible, I gotta believe him. I could be proven wrong (and many would be happy if I were) but I just don't see any proof so far.
Inconclusive and a work in progress on my part. No disrespect for Spencer, as I have not had the pleasure of meeting or chatting with him but always respect those with tenacity to challenge “can’t” . I suspect we could have different circumstances. In my case I know I have a fourth wheel that has come loose from its staking, it will lift to the bottom of the spring plate, flap and spin around. I had pressed on the wheel and it popped loose. With a loupe I can see where it was staked. In the case of others (and a common problem) is the spring breaking as is shown in Dahasco post (link above and thank you @guy), 11th photo, bottom half of spring. If the spring is broken your probably toast without a replacement. I believe if I can obtain enough information from those that have gone before me, to get a clear understanding of what holds the assembly on i.e. minute counter, heart-reset, spring then it can be lifted off without damage so that I can re-stake the 4th wheel. So the direct answer to your question is “no”, proceeding with caution. |
|
GuyJ
Needs a Life!
Whitley Bay, UK
Posts: 2,860
|
Post by GuyJ on Apr 30, 2019 8:35:28 GMT -8
Wishing you well!
|
|
pip
WS Benefactor
Berkshire, UK
Posts: 6,174
|
Post by pip on Apr 30, 2019 11:53:49 GMT -8
Me too! Would be great if you could update us as you experiment.
|
|
wdc
Newb
Posts: 37
|
Post by wdc on Apr 30, 2019 15:02:02 GMT -8
A friendly update: apparently rogart63 over at WRT offered Dahasco the scrap chrono wheels to tear down.
Thanks @rogart63
Your input is always appreciated and cleared up one of the mysteries I had with Dahasco’s post photos. The first couple of photo appears to be a metallic retaining washer, which I now think it is, originally thought is was a long collar passing though the top three assy parts, (mine is also metallic with no staking marks).
Starting on the third photo the washer changes to brass, with a clear staking ring .5mm off the bore. the change in the washer from metallic to brass must be Dahasco using more then one of the units you sent to him.
You can really see the staking of the retaining washer on the sixth photo. Anther interesting point is the machined step in the bottom side of the washer, with I assume fits into the brass “Chronograph Finger for the Minute Intermediate Wheel”.
Again all of this is based on a lot of assumptions on my part, while looking though the work Dahasco has provided.
What I have not worked out is why on the metallic washers there is no sign of staking, leading me to think it could be an interference fit pressed onto the shaft.
A little more research on my end before committing my chrono wheel, filling in working on a Citizen 8110A bullhead I just received parts for.
Take care
|
|
|
|
Post by 69ChevelleSS on May 1, 2019 5:17:46 GMT -8
So . . . . was it ever determined that the wheel can or can not be fixed?
According to Spencer, it can not be fixed. He's the kind of guy that would spend hours or days trying to figure out a fix just for the challenge of it. If he say's it's not possible, I gotta believe him. I could be proven wrong (and many would be happy if I were) but I just don't see any proof so far.
Inconclusive and a work in progress on my part. No disrespect for Spencer, as I have not had the pleasure of meeting or chatting with him but always respect those with tenacity to challenge “can’t” . I suspect we could have different circumstances. In my case I know I have a fourth wheel that has come loose from its staking, it will lift to the bottom of the spring plate, flap and spin around. I had pressed on the wheel and it popped loose. With a loupe I can see where it was staked. In the case of others (and a common problem) is the spring breaking as is shown in Dahasco post (link above and thank you @guy), 11th photo, bottom half of spring. If the spring is broken your probably toast without a replacement. I believe if I can obtain enough information from those that have gone before me, to get a clear understanding of what holds the assembly on i.e. minute counter, heart-reset, spring then it can be lifted off without damage so that I can re-stake the 4th wheel. So the direct answer to your question is “no”, proceeding with caution. I too wish you all the luck in the world as I too love the 6139s and hate to see them out of commission.
I've known Spencer for many years now and have watched just about every video he's put up on youtube. He's done some incredible work to successfully salvage watches that most would have thought were done. He's got a very special mind and doesn't easily say "no" to a problem. He's very creative and determined. You have to watch his videos to understand.
Perhaps you might want to reach out to him and see what his thoughts are on what you're trying to accomplish. No point in trying to re-invent the wheel if someone has already "been there and done that".
Best of luck and looking forward to updates.
|
|
wdc
Newb
Posts: 37
|
Post by wdc on May 1, 2019 9:38:58 GMT -8
SEIKO 6138/6139 Repair Procedure of CENTER CHRONOGRAPH WHEEL.... SEIKO 6138 CHRONO Repair-003 by William Cherrington, on Flickr Sorry for the reprint, I have been struggling to wrap my brain around inserting a image into the post. Got it now |
|
wdc
Newb
Posts: 37
|
Post by wdc on May 2, 2019 12:56:09 GMT -8
Gentlemen, for those that wanted to follow this disassembly it seems that I (by mishap) have failed you. I lost my step by step photos showing the disassembly, when getting a message on my tablet photos where being saved on my SD card do to space it turned out, it was defective, and photos lost. Summary: the operation (for the most part) was a success, sadly the patient died ☹ I did find I had a chrono having the fourth wheel with a tooth missing, making the loss easier to take. After studying DAHASCO photos, it was clear that the assembly (i.e. retaining washer, minute counter, heart-reset, spring clutch) was staked on the extended second hand chrono shaft and retained by the staked washer at the top of the stack. The challenge started with finding a way to back-up the parts, while using a stake to drive the shaft down though the staked retainer-washer and subsequent parts. The tool I decided on was a (modified) case splitter, flipping the dies over and squaring them so that I could fit the die edge between the heart and spring, essentially backing up the heart. there is not a lot of space. Using a stake, I tapped the pivot-shaft down though the washer, freeing the washer, minute counter, heart-reset, leaving (on the shaft) the spring and fourth wheel. Now, this is where the patient died and a detail one should take note. The above working so well, I thought I would proceed by backing up under the spring assy, driving the pivot-shaft down though the spring clutch. This was a mistake, as I did not understand the spring assy is two parts. The upper spring half which includes an incorporated collar that the spring is fitted to, fits over the shaft, and a bottom backing plate (a clutch pressure plate) which is attached to the fourth wheel ASSY. By backing up under the spring pressure plate then tapping down on the shaft, I bent the plate and damaged the adjoining spring. Patient died. What did I learn and what to do different next time? The top half of the spring needs to come off after the heart-reset, it is fitted to it’s own shaft collar. There are some groves on the collar that I could use my back-up tool to hold while driving the pivot-shaft though the collar freeing the spring (top half) . Closing: I am sad I lost the photos as it shows (all those that follow me) that each part can come off without any damage. The springs and other parts can then can be saved (harvested) and used elsewhere. The photo(s) attached below are of anther chronograph wheel (compete) just to show you how it was fitted. I am not ready to disassemble this one as I need time to maul the post-mortem, before committing. Also based on this exercise I have another idea how to fix a loose fourth wheel without disassembling the chrono assy. Well I wish you all good luck, hopefully this is helpful to however steps up to carry the torch , please keep me posted. All the best, Will  SEIKO 6138 CHRONO Repair-006 SEIKO 6138 CHRONO Repair-006 by William Cherrington, on Flickr  SEIKO 6138 CHRONO Repair-007 SEIKO 6138 CHRONO Repair-007 by William Cherrington, on Flickr  SEIKO 6138 CHRONO Repair-008 SEIKO 6138 CHRONO Repair-008 by William Cherrington, on Flickr  SEIKO 6138 CHRONO Repair-009 SEIKO 6138 CHRONO Repair-009 by William Cherrington, on Flickr  SEIKO 6138 CHRONO Repair-010 SEIKO 6138 CHRONO Repair-010 by William Cherrington, on Flickr 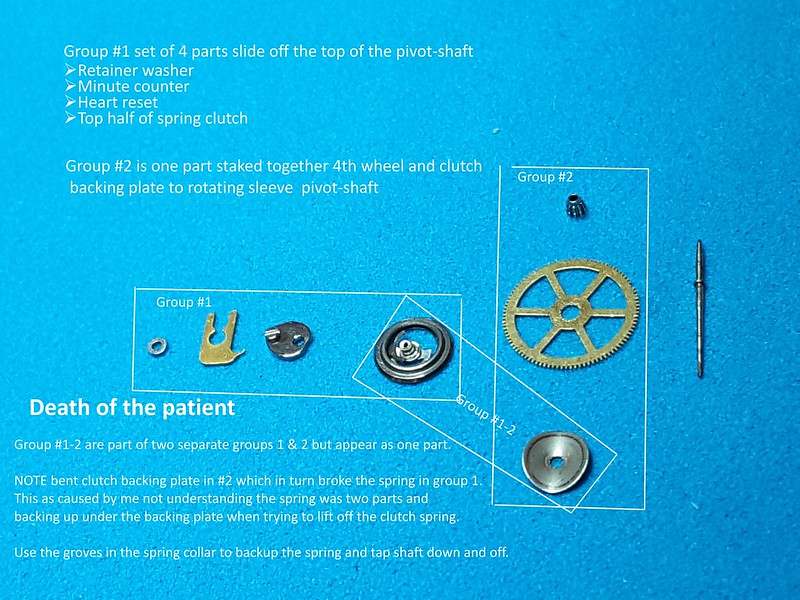 SEIKO 6138 CHRONO Repair-011 SEIKO 6138 CHRONO Repair-011 by William Cherrington, on Flickr NOTE: that in the photo above, in Group #2, third part down, is the clutch backing (or pressure) plate. It should be flat, not bent up as photoed, which is a result of me mistakably using it as a backup point when trying to drive the shaft down though the clutch spring. I believe you can use the groves on the spring collar to hold it while driving the shaft though it. Concussion
Again had I understood that the spring was two half’s I could have disassembled the chronograph wheel without damaging the spring. Now whether this is worthwhile, I am not sure. I guess if one had a chrono with a bad pivot, one could interchange the shaft, ect. This is yet to be seen. For me the challenge was can a chronograph wheel be disassembled. I believe my next shot, understanding how the spring is assembled that I can demonstrate it can, without breaking any part including the spring. |
|
GuyJ
Needs a Life!
Whitley Bay, UK
Posts: 2,860
|
Post by GuyJ on May 2, 2019 14:12:26 GMT -8
Shame about the photos missing, but superb progress. Just goes to show with the right mindset, tools and approach that it could be done! Excellent! Now I just wish I could follow...and...be willing to have a go!  Please do take photos of your next mission as it might well be one of the most important threads to have happened for a long time. |
|
wdc
Newb
Posts: 37
|
Post by wdc on May 2, 2019 17:00:06 GMT -8
I would like to add that if anyone with and interest in this, that has damaged/scrap 6139-6138 chrono wheel(s) that your happy to donate to the cause, I will pay the postage (emailing you a prepaid label) and of course share with you and the group the photos documentation of the evolving procedures.
Alternatively, I am happy to share anything I have learned if someone else would like to try your own.
All the best,
Will
|
|
|
|
Post by SeikoPsycho on May 3, 2019 1:55:18 GMT -8
Great work Will!
Regardless of what others have claimed, it's once again proved "where there's a Will, there's a way" (pun intended).....
I'm looking forward to a follow up. Keep up the good work!
I'd also like to hear your thoughts on how to re-stake or re-attach a 4th wheel without disassembling the chronograph wheel..........
|
|
pip
WS Benefactor
Berkshire, UK
Posts: 6,174
|
Post by pip on May 3, 2019 13:41:52 GMT -8
This is fantastic progress Will, just superb! Keep going, there are many people rooting for you to succeed and add a new chapter to the Seiko community’s knowledge base. Where you walk, others will follow.
|
|
wdc
Newb
Posts: 37
|
Post by wdc on May 10, 2019 22:00:56 GMT -8
Great work Will!
]I'm looking forward to a follow up. Keep up the good work!
I'd also like to hear your thoughts on how to re-stake or re-attach a 4th wheel without disassembling the chronograph wheel..........
Just a quick follow up to let those that are following and/or interested in this chrono subject. I was successful making the non-disassembly repair on a damaged chronograph 4th wheel, using infomation learned from the chrono disassembly. I will try to get some photos and an explanation over the weekend. All the best, Will |
|
wdc
Newb
Posts: 37
|
Post by wdc on May 11, 2019 12:45:11 GMT -8
Following the disassembly of the Seiko 6138 chronograph wheel in an effort to re-stake a loose and wobbly 4th wheel I learned a number of things. 1. Is that the chrono-assembly (ASSY) can be disassembled and parts harvested. A point that I am about to put to the test, as I have a 6138 chrono with a broken extended shaft for the second hand. And I have a good shaft from the reference disassembly. Providing this is a 6138 shaft and not the shorter 6139, haven’t checked yet. 2. I also learned that the 4th wheel is not simple staked to the rotating spur gear, it is part od a (3 part) sub-ASSY i.e. 4th wheel, clutch backing plate, (both staked to a) spur gear. In order to stake the 4th wheel one would have to remove the clutch pressure plate. I have not figured out how the plate is staked as it was damaged when I backed up under it during disassembly. 3. Lastly and most important I realized based on the design of the sub-assy, there was a better and less involved method to fix a loose 4th wheel. This is what I will cover in the following. Now with item 3 said, it is going to make some dyed in the wool horologist cringe that I propose the use of a two-part epoxy to fix the problem. Cringing aside with my own engineering background (even that my background is Oil & Gas not horology) I cannot see (or project) how it is not an equally sound approach. With all said here we go… Example Of Sub-Assembly From Another Chrono  Fourth wheel repair photo-001 Fourth wheel repair photo-001 by William Cherrington, on Flickr  Fourth wheel repair photo-002 Fourth wheel repair photo-002 by William Cherrington, on Flickr  Fourth wheel repair photo-003 Fourth wheel repair photo-003 by William Cherrington, on Flickr This is a chrono with a loose wobbly 4th wheel. Note the damaged chrono ASSY has a fourth wheel broke lose from its staked position, and moving back against the clutch pressure plate leaving and open gap.  Fourth wheel repair photo-004 Fourth wheel repair photo-004 by William Cherrington, on Flickr After epoxy and repositioning the 4th wheel to spur gear, chrono was rotated to true the wheel and clutch backing plate. Be careful note to get epoxy in the teeth of the spur gear.  Fourth wheel repair photo-005 Fourth wheel repair photo-005 by William Cherrington, on Flickr Phase Two apply 5min Epoxy 1. With 4th wheel set and true, fill space between 4th wheel and clutch plate 2. Decided to apply epoxy drop between wheel spoke to stay clear of clutch ASSY 3. Wait until viscosity of epoxy is right to flow down around spur hub but not run 4. Rotate ASSY to apply epoxy between every spoke, building epoxy to wheel hub OD 5. Double check spur teeth are clear of epoxy and let cure. During step 4 I would use my rubber band to rotate ASSY to keep epoxy centered 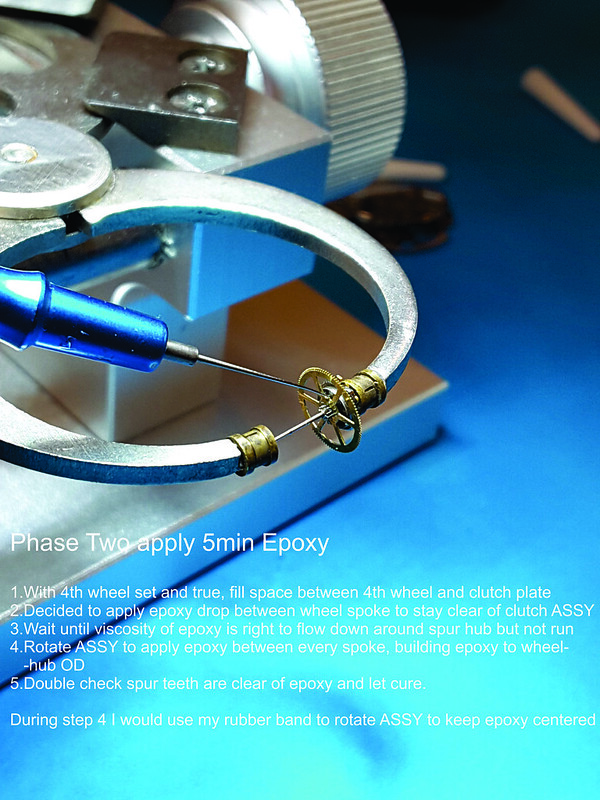 Fourth wheel repair photo-006 Fourth wheel repair photo-006 by William Cherrington, on Flickr SAVED TO COUNT ANTHER DAY Note epoxy buildup between 4th wheel hub and clutch backing plate. Gentilly using a pair of hand pullers, pull the spring back off the backing plate to confirm they are not glued together  Fourth wheel repair photo-007 Fourth wheel repair photo-007 by William Cherrington, on Flickr That’s All Folks…. Good luck on your repair and take care. Will |
|


